
FliersHaveMerit
Fliers have merit, those meritorious fly, those who don't fly have no merit!
LinuxTrack
Among the programs that provide head tracking on Linux, we find LinuxTrack. This program works on OSX as well, which makes one of the authors of the FreeTrack program responsible for providing free head tracking software for all operating systems which are currently in wide use on desktop computers. As if things weren't interesting enough, the mentioned gentleman provided support for NaturalPoint products in LinuxTrack, and consequently, TrackIR users wishing to migrate to Linux or OSX won't be forced to stop using their sets. Apart from TrackIR cameras, more expensive cameras such as Wiimote are supported, but there's also support for cheaper web cameras that provide about 30 FPS and cost around 10E. LinuxTrack was used with one of these cheap webcams to provide head tracking in the IL- 2 Sturmovik: 1946 simulator on Linux for the need of, among other things, gathering the material published on this page. Whether the author implemented interpolation that was mentioned on a forum a while ago or not remains unresearched, however, LinuxTrack remains usable even with cheap web cameras. Apart from a web camera and LinuxTrack, a point model will also be necessary unless one wishes to use the face tracking module that can be selected in the appropriate LinuxTrack GUI menu.
Before LinuxTrack is installed and configured, it's wise to check whether the web camera drivers are present, integrated into the kernel or as a module, and install and activate them if necessary. On Linux Mint, those luckier among the users will find it sufficient to follow the instructions on this page, while those not as lucky can find more detailed instructions on this page. For most users however, things won't be complicated because a USB camera with ViMicro chip, of the sort which is built into cheap web cameras that aren't known for their presence on the market, worked right of the bat on Linux Mint. Those planning to buy a web camera which will be used for head tracking on Linux would be well advised to check which cameras are supported in the kernel of the Linux distribution that's in use in order to skip integrating driver modules into the kernel and it's compiling. After the web camera drivers are properly installed, everything needs to be adjusted in order to provide reliable head tracking. Users who plan to use their cameras purposefully, that is to record images of their own persons while using Skype, record images of themselves and their surroundings for some other reason, or for video surveillance, and motion detection software does exist for Linux, probably will not wish to remove IR filters from their cameras. In such a case, the user will have to adjust the web camera settings every time one wishes to use it for head tracking, for which purpose the V4L2 Control Panel applet accessible through Linux's Software Manager can be used. Eliminating the environmental radiation will be more difficult to achieve in such a usage scenario. The following image shows V4L2 Control Panel settings which work well for a camera from which the IR filter was removed and which was fitted with a visible light filter. This could, perhaps, help users who didn't remove IR filters from their own cameras:

Just like on Windows, it's very important to disable automatic exposition.
For users who don't find it important to have a fresh image of themselves to post on Facebook, daredevils eager to grab the sick and fly as soon as they switch their computer on, things can be a lot simpler once everything is properly set. Removing the IR filter from the web camera is the first step. Detailed instructions about removing the IR filter from an A4Tech PK333 web camera can be found on this page. Based on these instructions, owners of other types of cameras may get a fair idea of what needs to be done. Once the IR filter is removed from the camera, it's necessary to fit a visible light filter on it in order to ensure that as much IR radiation emited by the diodes reaches the camera as possible, while preventing the ambiental radiation from reaching the lens at the same time. Information about the appropriate materials of which a good visible light filter can be made can be found on the relevant page of the Free track website. Linux Mint with KDE desktop users will, after the filters have been sorted out, need to install the V4L-ctl tool by executing the following line in the Bash shell:
sudo apt-get install v4l-utils
, and then, somewhere in the home folder, for instance in the ~/myscripts/ folder, a script named, for instance, "setcam.sh" will need to be created which will contain the necessary camera settings. In the end, the execution of this script on every system boot up needs to be ensured. Creating the folder and the script containing file that were mentioned is easily done in the Dolphin file manager by opening the user's home folder, right clicking on empty space and selecting Create new > Folder, and then typing the name of the folder in the requester that pops up. Once the folder is created, it needs to be opened, and then one needs to right click the empty space again, select Create new > Text file and type in the name of the file in the requester. It is important for the extension of this file to be .sh. Now the new file needs to be opened in a text editor by right clicking it's icon and selecting Open with > Kate. The following lines which contain instructions for setting the web camera now need to be copied into the file:
#!/bin/bash
v4l2-ctl --set-fmt-video=width=320,height=240,pixelformat=YU12
v4l2-ctl --set-ctrl brightness=0
v4l2-ctl --set-ctrl contrast=0
v4l2-ctl --set-ctrl gamma=4
v4l2-ctl --set-ctrl gain_automatic=0
v4l2-ctl --set-ctrl exposure=781
v4l2-ctl --set-ctrl power_line_frequency=1
v4l2-ctl --set-ctrl sharpness=0
v4l2-ctl --set-ctrl compression_quality=50
and the file needs to be saved to disk. To ensure the execution of the script that was just created on every system boot up, the file /etc/rc.local, from which scripts which are meant to be executed on every system boot up are invoked, needs to be opened in a text editor by executing either of the following commands in the Bash shell:
sudo nano /etc/rc.local
or
sudo kate /etc/rc.local
, where "nano" and "Kate" are the names of text editors bundled with Linux Mint KDE distribution. Then , the following line needs to be appended to the file:
sh /home/username/myscripts/setcam.sh
and the file needs to be saved to disk. In the last line, 'username' stands for user name under which the user is logged onto the system, while the names of the folder and the script containing file in the path need to be changed to the names that were opted for if those names differ from the names suggested in the examples above. After a reboot, the camera will be set according to the values in the script, and everyone can adjust those values to suit their own needs. Users of distributions other than Linux Mint with KDE desktop will have to find their own way around loading the camera settings automatically, but hopefully, things can't be terribly different.
After the camera has been properly set, the moment arrives to install and configure LinuxTrack. Back when the installation package containing this program was available on code.Google.com website, in order to facilitate functioning of LinuxTrack on 64bit systems, there was a need to track down and install the necessary libraries, while nowadays, instructions for compiling and installing LinuxTrack along with the instructions for downloading and installing the aforementioned libraries can be found on GitHub, for Linux distributions with both Debian and RPM package managers. Someone may find the task intimidating, but the instructions are, apparently, detailed enough for even a beginner to complete the task successfully.
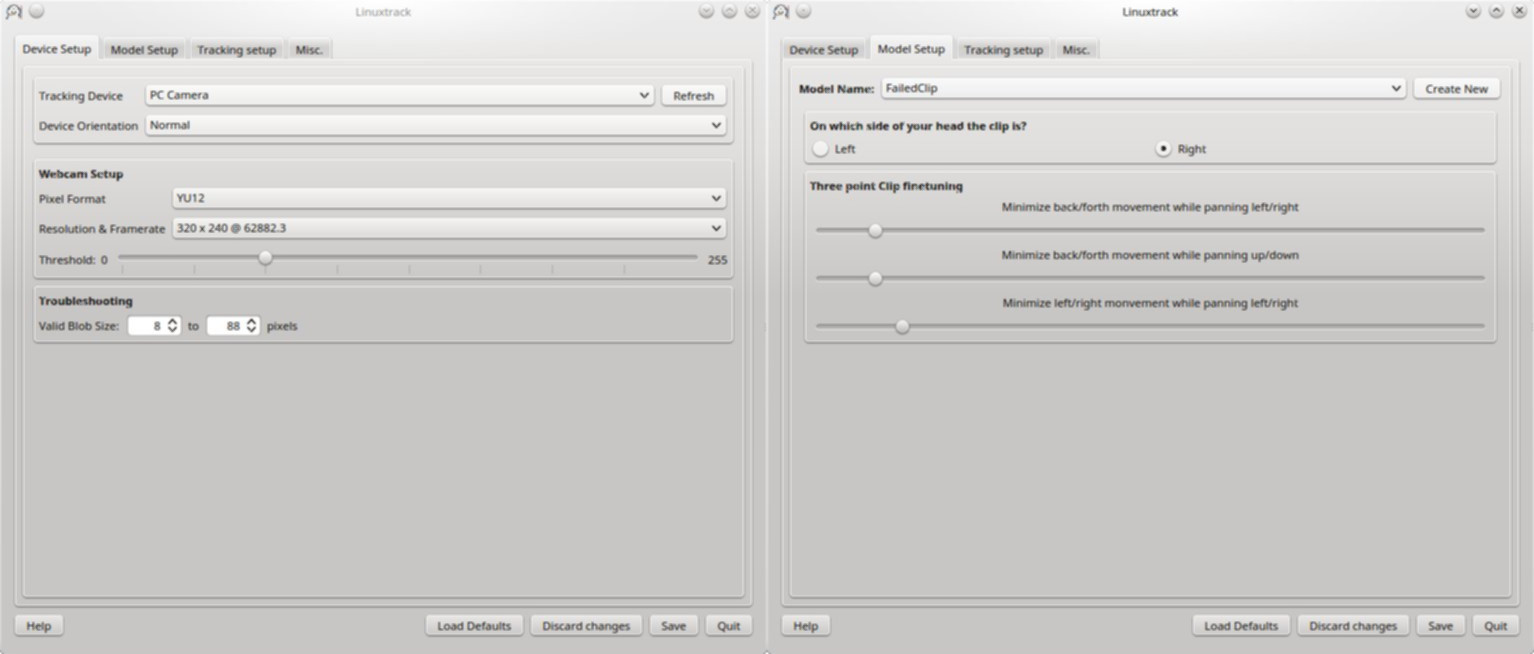
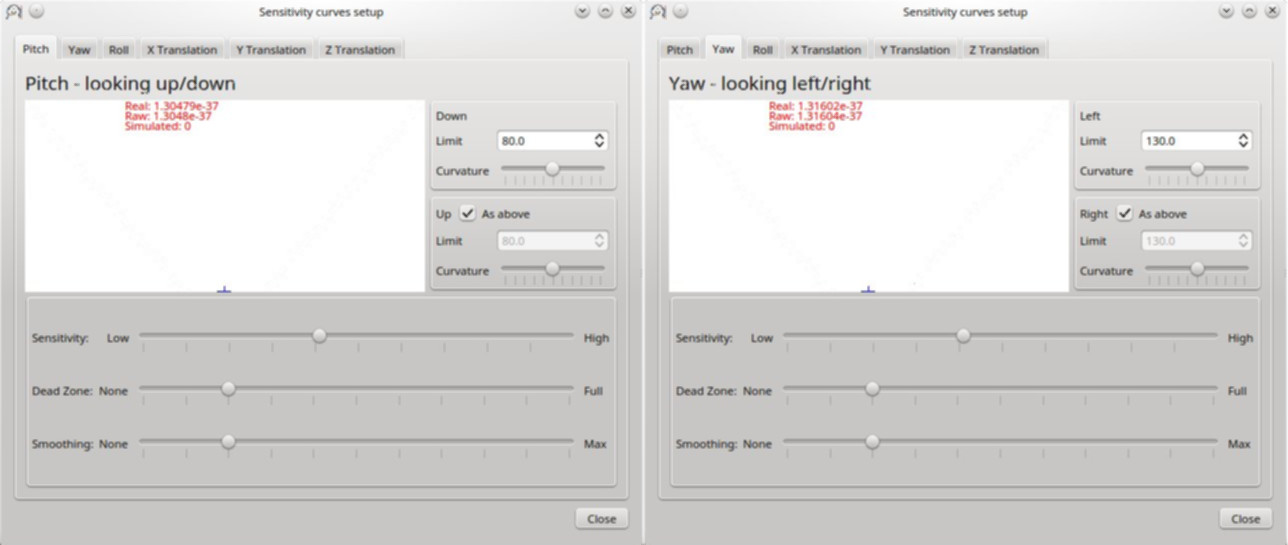
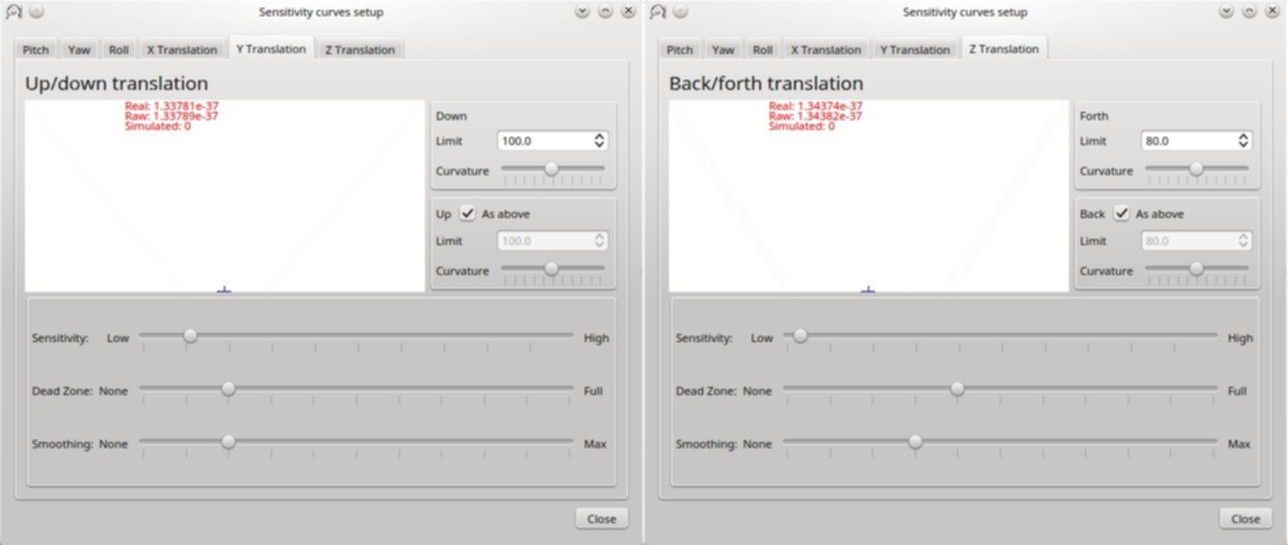
After LinuxTrack has been successfully installed, the graphical user interface of this program needs to be started (ltr_gui), which can be done by creating a desktop icon pointing to this applet in LinuxTrack installation folder, and then one needs to select the camera model, resolution and pixel format set for the camera earlier (RGB, YU12,... ), select a point model or define dimensions of one along with the rest that may need defining for different point models, and finally configure response curves, smoothing and head tracking gimbals. The following images depict settings that yield good results with a three point clip:


After the configuring has been finished, everything can be tested by clicking the 'Start' button in the left hand window of the graphical user interface, thereby starting the camera as well as head tracking. If the test went well, the question remains of communication between LinuxTrack and client software. The simplest way to go about this is to install the Wine plugin, which in essence emulates TrackIR or provides direct support for it, depending on the hardware that's used, by clicking the "Install Wine plugin" button in the right hand window of LinuxTrack's graphical user interface marked with "Misc.". LinuxTrack will then present a requester to the user, asking for the path to the wine prefix into which the plugin should be installed, after which the necessary files will be copied to the wine prefix designated. If the intent is to use a single wine prefix, the default one, the following should be typed into the path field in the requester:
/home/username/.wine/
or
~/.wine/
, where 'username' stands for the user name used to log onto the system. For TrackIR users things will probably work out smoothly, while web camera owners may perceive that they only get full range of motion for rotation around two axes, with the motion being very limited with regard to other axes. Pilots of the IL- 2 Sturmovik: 1946 simulator on Linux can overcome this by using the LinuxTrack Pipe applet instead of the Wine plugin. Along with providing proper six degrees of freedom head tracking support for the IL- 2 Sturmovik simulator on Linux, this applet also provides head tracking support for Flight Gear and Silent Wings simulators, as well as support for joystick and mouse emulation. For LinuxTrack pipe to work properly with the IL- 2 simulator, it is first necessary to append the lines below to the conf.ini file situated in the installation folder of this simulator:
[DeviceLink]
port=6543
host=127.0.0.1
and save the file to disk. For head tracking to be active when the simulator is started, LinuxTrack pipe needs to be invoked by executing the following command in the Bash shell:
ltr_pipe --output-net-udp --format-il2
It could so happen, while attempting to execute this command, that the active directory will have to be the bin/ subdirectory of the LinuxTrack install directory for the command to work. Those not thrilled by the prospect of executing this command every time they wish to fly may resort to creating a link to an application on the desktop, right- clicking it, selecting 'properties', selecting the 'application' tab and filling the 'Command' and 'Work path' fields with the following lines:
/opt/linuxtrack/bin/ltr_pipe --format-il2-6dof --output-net-udp
/opt/linuxtrack/bin/
, respectively, provided that LinuxTrack is installed into the /opt/linuxtrack/ folder, or that a symbolic link linking the aforementioned folder to the installation folder exists. Should the case be the opposite, the path to LinuxTrack installation directory should be specified in the lines above. After the name and the description of the link have been entered as desired, it will be possible to run LinuxTrack pipe by double clicking the desktop icon that was just created. Configuring keyboard shortcuts which will pause, resume and center head tracking is the final step. To pause and resume head tracking, LinuxTrack pipe needs to receive the signal which is sent by issuing the following command:
kill -USR1 `pidof ltr_pipe`
, while the command for centering is:
kill -HUP `pidof ltr_pipe`
If the "Shortcuts and Gestures" applet in "System Settings" of a Linux Mint KDE installation is started, and then things are set to resemble the following images:
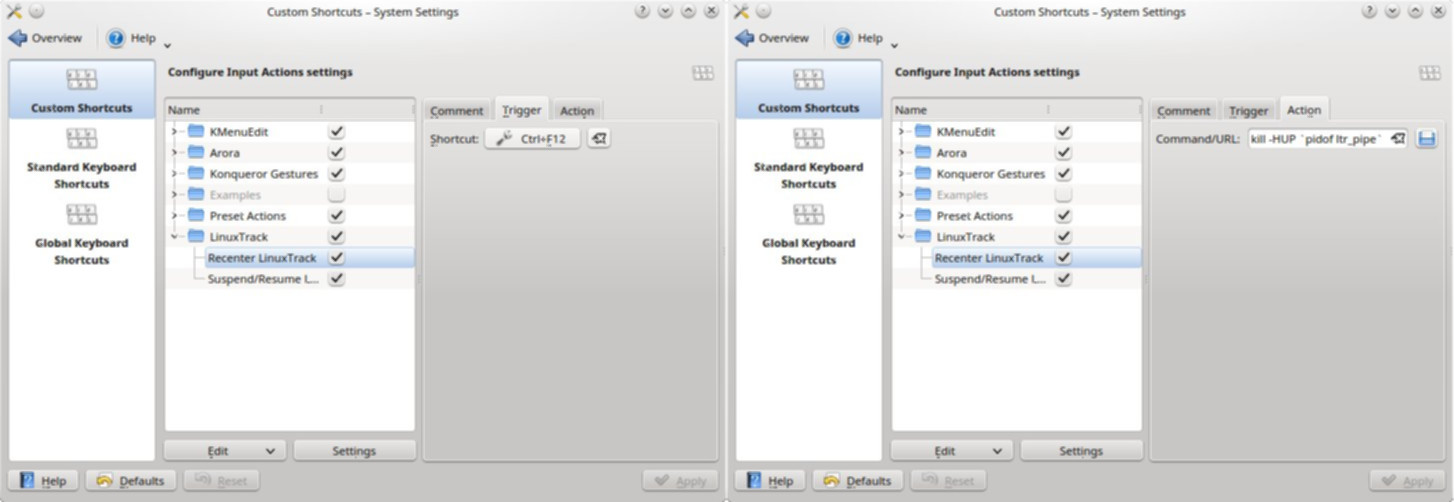
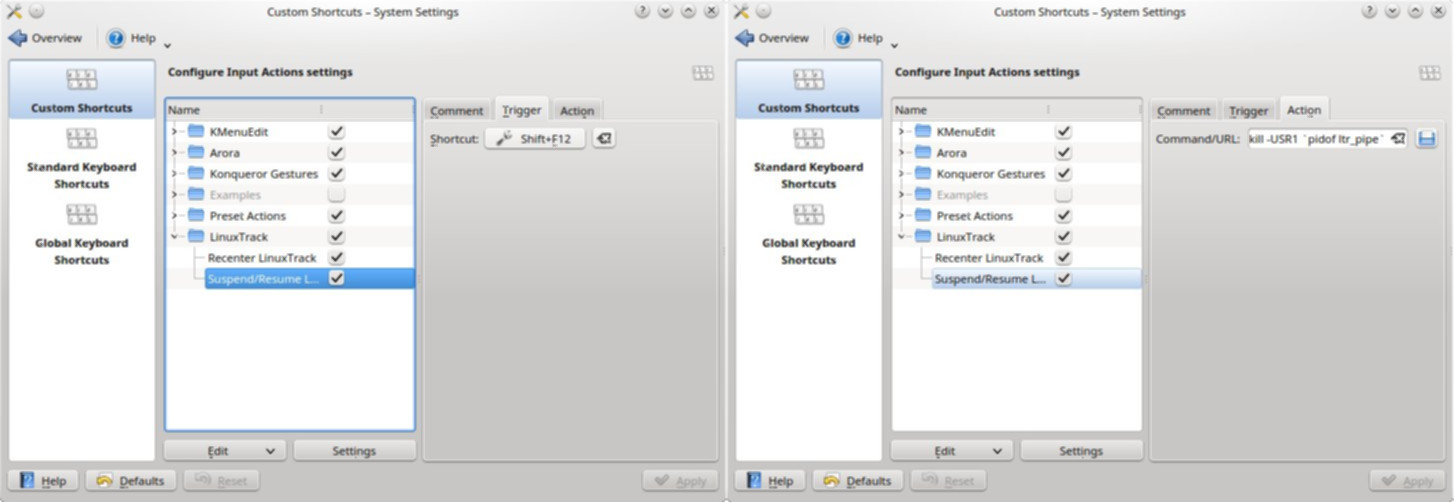
, pressing the SHIFT+12 key combination on the keyboard will pause or resume head tracking, while pressing CTL+F12 will center it.
Generally, Wine plugin shouldn't be installed into the same Wine prefix into which the software which is used with LinuxTrack pipe is installed, because a conflict between these two interfaces could cause unwanted effects while head tracking. It is best to install programs that use Wine plugin and programs that use LinuxTrack pipe into separate Wine prefixes, which can be done by following instructions posted on the page that was already linked, or in a simpler way, by using the PlayOnLinux program. If Wine plugin is used, it will be necessary to keep the Controller program, situated in the same Wine prefix into which Wine plugin is installed, active and minimised in order to provide for pausing, resuming and centering head tracking. Lastly, it may be worth wile to turn the reader's attention to the fact that it's wholely unnecessary to keep the LinuxTrack GUI on while head tracking. It's enough to load either the Controller applet or LinuxTrack pipe.
While someone may conclude that too many simple details have been disclosed on this page, it represents an attempt to help even absolute beginners with spending as short a time period as possible installing and configuring software and reallocate said time to flying instead. On the other hand, because an older, but still quite functional version of LinuxTrack was used while material that's published was being gathered, and also because all Linux distributions don't function exactly the same way, it could happen that an odd reader will have to remember that Google is one's friend and find a more appropriate way around things for oneself.
If You are ready to get pumped visit totally sweet mammels, or the following website.