
FliersHaveMerit
Fliers have merit, those meritorious fly, those who don't fly have no merit!
OpenTrack
All who ever read a book in which a character is described as "patched up, but neat", and there are several instances, already know what kind of an impression the free head tracking program styled OpenTrack will leave on them. This program evolved from the FaceTrackNoIR program which is built modularly itself, while further development provided the home user with the possibility of tracking the position of one's own head in several different ways, using different devices, expensive or cheap, with astonishingly good results. This flexibility was provided by many authors who contributed modules which, apart from facilitating the use of a mere webcam as the sensor, also provide the possibility of using other devices, such as the magnetometers present in Android or Windows cellphones. The EDTracker device, which also uses a sensor present in modern cellphones, reports to the operating syste as a joystick which makes it convenient for use with OpenTrack, except that the users who choose to use cellphones will have to attach whole phones to their heads. There's also the possibility of using certain cellphone types, lenses and plastic framework to build a set of homemade virtual reality goggles which can be used with OpenTrack. To be able to tweak the output to one's own liking, the user has the option of adjusting the response curves as well as filters that influence the coordinates which are being sent to the client software and their refresh rates at one's disposal. OpenTrack also inherited the option of handing off the coordinates to another computer on which the client software is being run from it's older brother. More details can be found on the OpenTrack Wiki page.
In addition to everything mentioned, OpenTrack works on all operating systems widely used today. Installing on Windows is a straightforward process which boils down to running an installation archive which can be downloaded here, while installing on Linux represents a more complicated process which requires the source code of this program to be compiled on the local machine, the course of which will depend on the flavour of Linux on which installing is being attempted. During an attempt at installing OpenTrack on 64- bit Linux Mint operating system, which proved successful, a compiling and installing tutorial available on this page was used. Since the author of this page is a beginner in these matters himself, the reader who may find oneself interested in using OpenTrack on Linux and has no previous experience in compiling code is advised not to lose heart, but to study the linked tutorial, as well the experience of the author which will be presented on this page instead, because the result is well worth the effort.
In order to compile OpenTrack source code successfully, one first needs all the necessary libraries installed locally. For the sake of clarity, a list of packages which were installed in accordance with the tutorial, or which proved missing during the few compiling attempts on Linux Mint 17, will be presented:
gcc
gcc-4.8
gcc-4.8-base
gcc-4.8-base:i386
gcc-4.8-multilib
gcc-4.9-base
gcc-4.9-base:i386
gcc-multilib
lib32gcc-4.8-dev
build- essential
cmake
cmake-curses-gui
cmake-data
git
gist
git-man
libqt5concurrent5
libqt5core5a
libqt5dbus5
libqt5gui5
libqt5network5
libqt5printsupport5
libqt5serialport5
libqt5sql5
libqt5test5
libqt5widgets5
libqt5xml5
libevdev-dev
libevdev2
libeigen3-dev
libeigen3-doc
Packages from the above list can easily be installed by using the graphical user interface of Linux Mint's Software Manager. All this takes is entering a name of a package into the application's search field and clicking the install button if the package isn't present on the local system. Some packages will be installed as dependancies of some other packages,which will make the job shorter than a glance at the package list may suggest. CLI can also be used to install the aforementioned packages, and it's use will prove unavoidable while compiling and installing the latest version of the OpenCV package, which is necessary, according to the instructions available on this page. This does represent another compiling and installing process one will have to go through, but the instructions are written in small detail, while the whole lines from the page can be copied into the terminal window by pressing the CTL+SHIFT+V key combination. Once OpenCV is successfully compiled and installed, one needs to download the source code of OpenTrack onto the local machine, which is done by issuing the following commands in the terminal window:
cd ~/
git clone https://github.com/opentrack/opentrack
After said commands have been issued, a folder named 'opentrack' will be created in the user's home folder and the source code of OpenTrack will be downloaded into it. The process could take a while, depending on the connection speed. Then, it's necessary to point to the folder which contains the source code:
cd opentrack
and, within, create another folder which will be used while linking and compiling the source code, and then point to that folder. For instance:
mkdir build
cd build
The active folder should now be '~/opentrack/build', from which the ccmake tool, used for configuring options related to linking and compiling source code on different platforms, will be started. The ccmake tool should be pointed to the directory hierarchically above the active folder, since the source code is placed there:
ccmake ..
ccmake will extend salutations by displaying an empty screen with a short list of commands at the bottom. In order to configure the project for compiling on the local system, the 'c' key should be pressed, which will cause ccmake to read through CmakeLists.txt files contained by the source code. Configurable options with which, once configured by the user, the source code will be compiled, should now be displayed on the screen. Two columns will be presented, the left containing the name of the option and the right containing editable settings. Providing the possibility of joystick emulation under Linux will take enabling libevdev, and it also wouldn't be bad to set up an installation directory for OpenTrack, for which reasons the relevant lines in ccmake window should be edited to look like this:
SDK_ENABLE_LIBEVDEV on
CMAKE_INSTALL_PREFIX /usr/local/opentrack
By pressing the 't' key, the advanced configurable options are displayed in ccmake, which is necessary to do in order to check whether a missing folder is reported in the right- hand column, which is an indication that a required library is missing. Should this be the case, the packages that are still missing can be installed by using either the Software Manager, or the CLI terminal. Should one start feeling insecure with regard to installing the missing libraries, it should be kept in mind that it's always possible to delete the contents of the 'build' folder and run ccmake anew. Once everything is configured and accounted for, the 'c' key should be pressed again which will cause the relevant files to be read through again, after which process ccmake will, if content, present the user with the option of generating the files necessary for compiling the source code on the local machine by pressing the 'g' key, which the user should go ahead and do. Afterwards, ccmake should be exited and the following commands should be executed in the terminal:
cmake ..
make -j5
With any luck, OpenTrack will be compiled without any problems and the following passage doesn't relate to You. The source code for the release candidate of OpenTrack is available on github, which means that the version of the program in question is still being worked on. It could so happen that, for instance, the programmer has symbolic links set on one's machine that are not set on the machine on which compiling is being attempted, which will result in a failure. If an error report is perceived at this stage, the source code for the latest release version should be downloaded from the page that contains various OpenTrack releases, which was version 2.2 at the time the author of this page was compiling the version he uses. Archives containing Linux source code have the .tar.gz extension. Such an archive should be unpacked into a separate folder, '~/opentrack22' for instance, and the active folder should be changed to this folder:
cd ~/opentrack22
Then, one will need to repeat the whole process, starting with the step in which the 'build' folder is created.
Once the compiling process is completed with no errors, it's finally possible to install OpenTrack:
sudo make install
By executing the line above in the CLI terminal, compiled OpenTrack with joystick emulation support is installed into the preset folder, '/usr/local/opentrack' in the case at hand. Virtual joystick emulation support was added in order to provide head tracking for Linux native version of War Thunder, and, for this support to work as intended, it's also necessary to assign proper user privileges. This was done by following guidelines available in a tutorial available on this page, and the exact procedure will be presented in the following lines. First, one needs to create a text file containing the following:
KERNEL=="uinput", GROUP="uinput_group"
and save it to disk, into the home folder for instance, under the name 'uinput.rules'. Then, one needs to open up a CLI terminal, point to the home folder, and copy the newly created file to the '/lib/udev/rules.d' folder:
cd ~/
sudo cp uinput.rules /lib/udev/rules.d/
Then, one needs to create a new user group:
sudo groupadd uinput_group
, add the username of the account under which OpenTrack will be used to the new group:
sudo usermod -a -G uinput_group <your_username>
and reboot the system.
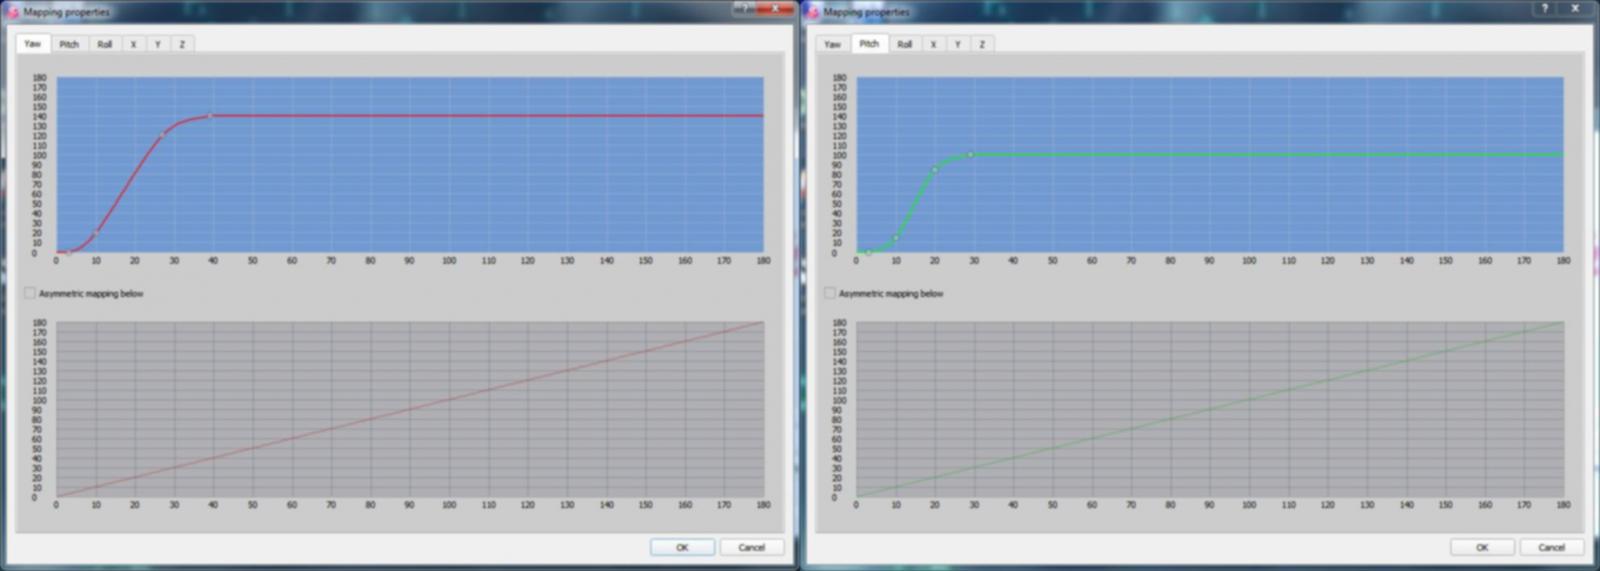
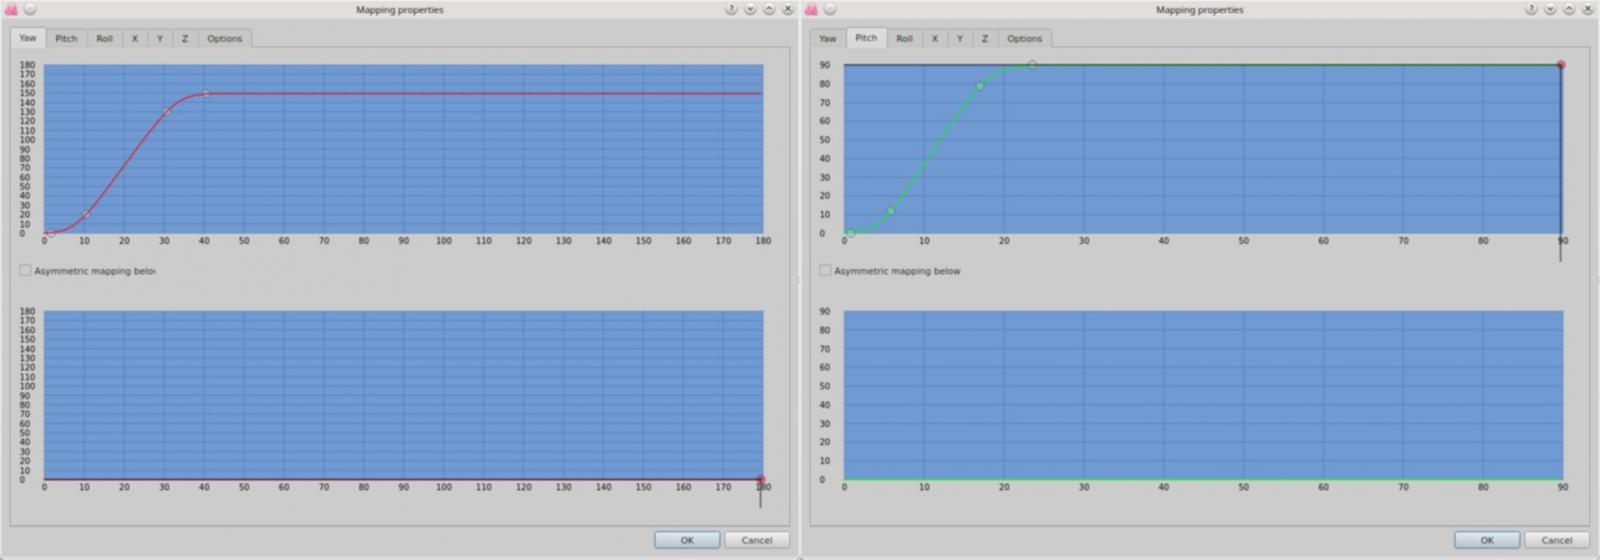
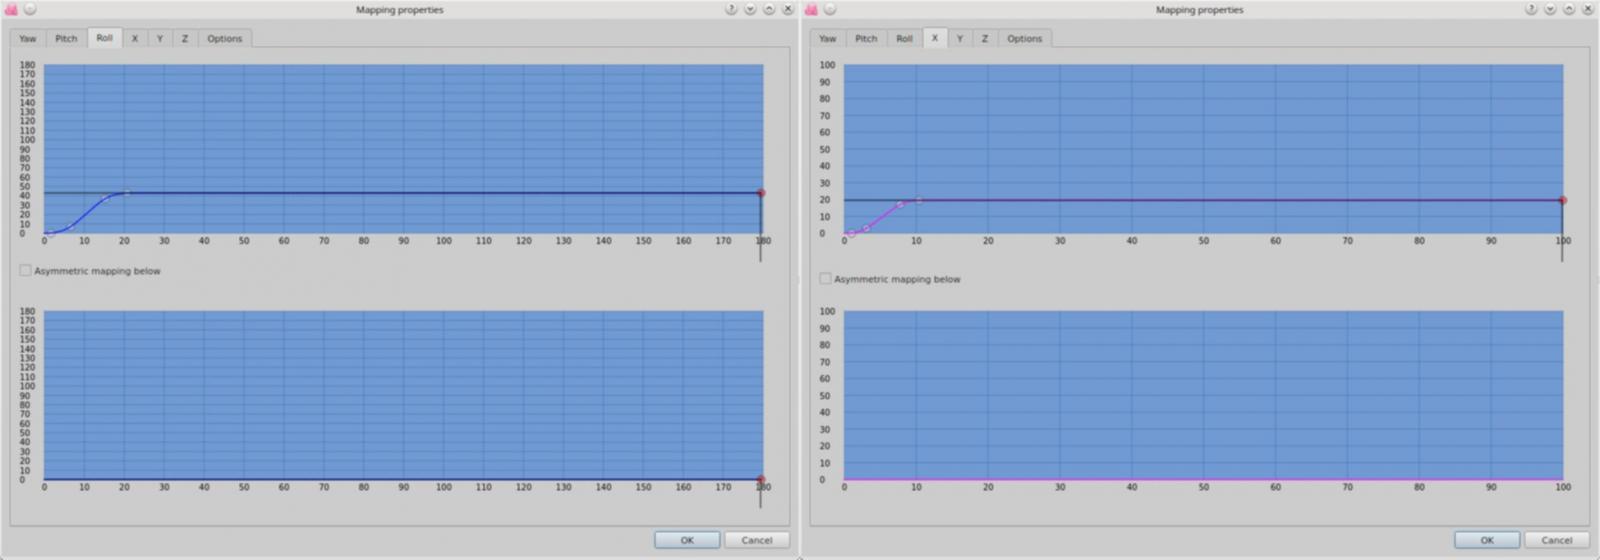
The settings of OpenTrack that bring it's performance to an optimum will depend on the sensor that's used, the point model, if used, as well as the needs of the user. In the case at hand, a cheap webcam was used alongside a three point clip with emitting diodes, while the head of the user was less than a meter away from the webcam. OpenTrack v2.3 was used on Windows, while version 2.2 was used on Linux. The images below reflect the settings that yielded good results in each separate case, should anyone find them useful.
Opentrack 2.3 on Windows:


OpenTrack 2.2 on Linux Mint 17:


If You are ready to get pumped visit totally sweet mammels, or the following website.